Assignment:
Purpose
To manipulate simulated magnets, compasses, and coils to see how magnetic fields interact with electric currents
Discussion
When Hans Christian Ørsted discovered that electricity could be used to produce magnetism, the scientific community anticipated that it wouldn't be long before someone would discover how magnetism could be used to produce electricity. But more than ten years would pass before Michael Faraday solved the puzzle.
The application of engineering to electromagnetism led to motors and generators. Nearly any electrical device that produces motion uses a motor. Any device that is plugged into a wall outlet draws power from a generator. Our reliance on applications of electromagnetism is never more apparent than during a power outage.
The interactions between electricity and magnetism are not always easy to grasp. In this activity, you will manipulate elements in a simulated laboratory and get visual feedback.
Procedure
PART A: BAR MAGNET
Step 1: Run the PhET sim, "Faraday's Electromagnetic Lab." It should open to the Bar Magnet tab.
Maximize the window. You should see a bar magnet, a compass, and a compass needle grid.
Step 2: Center the bar magnet horizontally on the fourth or fifth row from the top. Set the large compass just below the bar magnet at its
midpoint. It's okay for the two objects to be touching. See Figure 1.
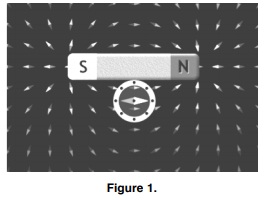
Step 3: If the compass needles (in the grid or in the large compass) are to be thought of as arrows indicating the direction of the bar magnet's magnetic field, each one should be visualized as pointing
Step 4: Using the on-screen slider in the control panel, run the strength of the bar magnet up and down. How does the sim show the difference between a strong magnet and a weak magnet?
Step 5: How does the strength of the magnetic field change with increasing distance from the bar magnet and how does the sim show this?
Step 6: With the magnet at its strongest, reverse it's polarity using the on-screen "Flip Polarity" button in the control panel. What are the ways in which the sim reflects this polarity reversal?
Step 7: Describe the behavior of the compass during a polarity reversal (magnet initially at 100%)
a. when the compass is touching the bar magnet at its midpoint.
b. when the compass is far from the bar magnet (touching the bottom of the sim window), but still on a perpendicular bisector of the bar magnet.
c. when the compass is far from the bar magnet and the magnet's strength is set to 10%.
Step 8:
a. Around the exterior of the bar magnet, the direction of the magnetic field is from its ____ pole to its ____ pole.
b. What is the direction of the magnetic field in the interior of the bar magnet? And how did you find out?
PART B: ELECTROMAGNET
Step 1: Run the PhET sim, "Faraday's Electromagnetic Lab." Maximize the window. Click the onscreen Electromagnet tab. Arrange the on-screen elements so that the top of the battery is along the second or third row of the compass grid. Notice that the magnetic field around the coil is very similar to the magnetic field around the bar magnet.
Step 2: There is no "Strength %" slider on the control panel.
a. How can you change the strength of the electromagnet?
b. In real life, is it easier to change the strength of a bar magnet or an electromagnet?
Step 3: There is no "Flip Polarity" button on the control panel. How can you reverse the polarity of the electromagnet?
Step 4: In the control panel, switch the Current Source from the battery (DC: direct current) to an oscillator (AC: alternating current). If necessary, move the electromagnet so that you can see the entire oscillator.
a. What does the vertical slider on the AC source do?
b. What does the horizontal slider on the AC source do?
Step 5: What should the sliders be set to in order to create a "dance party" display? Can you make the dance party even more annoying using the Options menu? Describe.
PART C: PICKUP COIL
Step 1: Run the PhET sim, "Faraday's Electromagnetic Lab." Maximize the window. Click the Pickup Coil tab. You should see a bar magnet, a compass needle grid, and a coil attached to a light bulb.
Step 2: Describe the most effective way of using the magnet and the coil to light the bulb if
a. the coil cannot be moved.
b. the magnet cannot be moved.
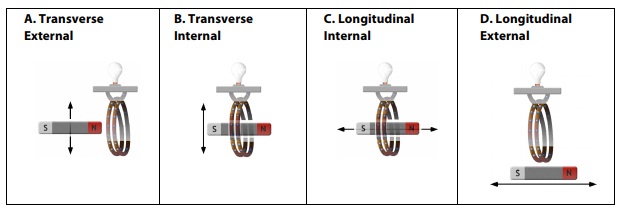
Step 3: Rank the arrangements and motions shown below from most effective to least effective in terms of lighting the bulb, allowing for ties. For example, if A were most effective, B were least effective, and C and D were equivalent to one another, the ranking would be A > C = D > B.
Step 4: Move the bar magnet through the coil and observe the motion of the electrons in the forward arc of the coil loops. Report the correlations of magnet motion and electron motion.

a. Magnet approaches from the left, north pole first; electrons move downward.
b. Magnet departs to the right, south end last; electrons move upward.

c. Magnet approaches from the right, south pole first; electrons move _?_.
d. Magnet departs to the left, north end last; electrons move _?_.

e. Magnet approaches from the left, south pole first; electrons move _?_.
f. Magnet departs to the right, north end last; electrons move _?_.

g. Magnet approaches from the right, north pole first; electrons move _?_.
h. Magnet departs to the left, south end last; electrons move _?_.
PART D: TRANSFORMER
1. Run the PhET sim, "Faraday's Electromagnetic Lab." Maximize the window. Click the on-screen Transformer tab. You should see an electromagnet and a pickup coil.
2. Experiment with the various control panel settings and the positions of the electromagnet and the pickup coil to determine a method for getting the most light out of the bulb. Describe the settings and locations
PART E: GENERATOR
1. Run the PhET sim, "Faraday's Electromagnetic Lab." Maximize the window. Click the on-screen Generator tab. You should see a faucet, paddlewheel with bar magnet, compass, and a pickup coil.
2. Experiment with the various settings to determine a method for getting the most light out of the bulb. Describe the settings.
3. What is the story of light production here? Organize and connect the given "plot elements" and add any key elements that were omitted from the list to construct the complete story.
• light radiated from the bulb • changing magnetic field • induced electric current
• motion of the bar magnet • kinetic energy of the water • heat the filament