Questions:
ASPX (Phone Book Application: GUI)
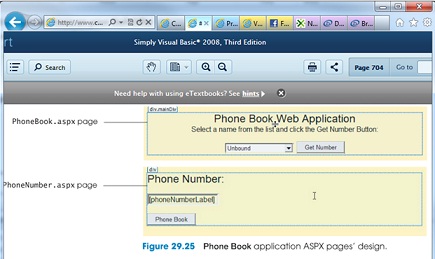
(Phone Book Application: GUI) Create the user interface for the Phone Book application. The design for the two pages for this application
a) Creating an ASP. NET web application. Create an ASP.NET web application project in the C: Si mpl yVB2008 directory, and name it Phone Book. Rename the ASPX page to Phone Book. aspx and set Phone Book. aspx as the start page. Also set the page's Title property to Phone Book.
b) Changing the font and background color of the page. Use the New Style dialog as demonstrated in this tutorial to change the font-family for the page to Arial, Helvetica, sans-serif and the background-col or to #FFFFCC.
c) Centering the div element's contents. Select the div element in Design mode. Use the New Style dialog to create a new style named. mainDiv with its text-align style attribute set to center.
d) Adding a Label. Create a Label named phone Book Label and change its Text property to Phone Book Web Application. Use the New Style dialog to create a . page Title style and set the font-size to X-Large.
e) Adding another Label. Create another Label named i nstructi onsLabel below the phone Book Label. Set the Text property to Select a name from the list and click the Get Number Button: .
f) Adding a Drop Down List. Position the cursor to the right of the instructions Label and press Enter twice. Insert a Drop Down List web control named names Drop Down List. The Drop Down List web control looks similar to the Combo Box Windows Form control. Set the control's Width property to 150 px.
g) Adding a Button. Create a Button named get Number Button to the right of the names Drop Down List. Change its Text property to Get Number.
h) Adding another ASPX page to the Phone Book application. Add another ASPX page to the Phone Book application and name it Phone Number. aspx. Change the Title property to Phone Number.
i) Changing the font and background color of the page. Use the New Style dialog as demonstrated in this tutorial to change the font-family for the page to Arial, Helvetica, sans-serif and the background-col or to #FFFFCC.
j) Adding a Label to Phone Number. aspx. Create a Label named numbers Label .
Change its Text property to Phone Number: . Use the New Style dialog to create a. page Title style and set the font-size to X-Large.
k) Adding another Label. Position the cursor to the right of the numbersLabel and
press Enter twice. Create another Label named phone Number Label . Clear its Text property, set its Border Style property to Inset, and set its Width property to 150 px.
l) Adding a Button to the Phone Number. aspx page. Position the cursor to the right of the phone Number Label and press Enter twice. Create a Button named phone Book Button. Change its Text property to Phone Book.
m) Saving the project. Save all the files in your project.