1. Introduction
Intelligent homes are becoming increasingly popular as cost/performance ratio of microcontrollers is continuously dropping. These systems incorporate a variety of transducers to detect and transmit status of the home to a supervisory microcomputer. Heating, lighting, security and other parameters are usually controlled by the microcomputer to give a comfortable and safe environment for the residents.
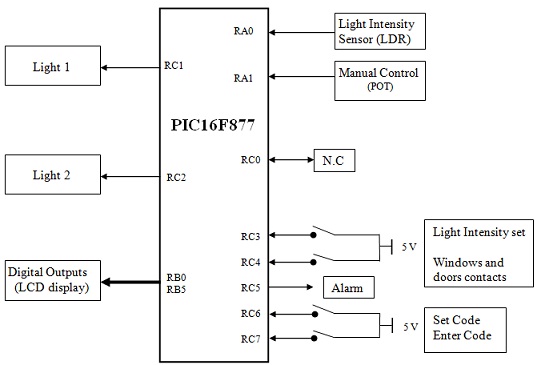
The block diagram of a simple home automation system is demonstrated below:
2. Input and output connections
Details of connections to the microcontroller input and output ports are explained below:
Analogue inputs:
Light Intensity Sensor (LDR) is connected to channel 0 of ADC (RA0).
Manual Control (potentiometer) is connected to channel 1 of ADC (RA1).
Analogue outputs:
Intensity of light emitted by the LED is controlled by PWM1 output (RC1).
Intensity of light emitted by the LED is controlled by PWM2 output (RC2).
Digital outputs:
LEDs connected to RC5 is used specify that a security link is broken.
RB0-RB5 outputs are connected to LCD.
Digital inputs:
RC3 switch is used to set desired ambient light on RC1 (light 1).
All window and door contacts are wire OR-ed and connected to RC4 input.
RC6 switch is used to increment security code from 0-9
RC7 is used to enter any of the three digit security code.
Table below shows the function of each bit of PORTC.
Bit number Connection Function
0 Not used X
1 PWM1 output Controlled by Potentiometer (POT)
2 PWM2 output Controlled by LDR
3 Sets light intensity When held high, the desired ambient light 1 can be set
4 Security loop High indicates a security breach
5 Alarm Flashing LED
6 Security code entry High-Low transition increments code by one
7 Enter code High-low transition enters one of 3 security digits
3. Objective:
To develop a ‘C’ program to emulate the intelligent home and evaluate its operation using E-BLOCK boards in the T5/03 Embedded Systems laboratory.
4. Purpose:
1. To write a structured and annotated ‘C’ program.
2. To provide evidence of the development of each stage of the program. This will consist of producing a logbook and a formal report.
3. To introduce new ideas or improvements to the system.
5. Tasks
The computer performs the following tasks.
1. The intensity of two lights is controlled either manually from potentiometer (dimmer mode) or automatically by measuring the intensity of ambient light using the LDR and adjusting the light output.
a) The intensity of LED connected to RC1 is adjusted by potentiometer. Press and hold RC3 switch and adjust the potentiometer from 0-5 V and show the set intensity on first line one of the LCD. The LED should light up to the required intensity when RC3 is released.
b) Intensity of LED connected to RC2 is controlled automatically by measuring the ambient light. When LDR is covered, the LED lights up to its maximum intensity (about 5 V) and turn off when uncovered. As you move your hand over the LDR, the intensity of the LED should change accordingly.
2. Contacts on the windows and doors are linked to form a continuous loop. RC4 is connected to the loop. When the window or door opens, voltage on the loop changes to 5V. This can be simulated by pressing the switch connected to RC4. A high on this pin indicates a security breach if the system is armed.
3. Security system could be armed and disarmed by entering a 3-digit code. Press the switch connected to RC6 repeatedly to change the first digit of the code from 0-9 as shown on the second line of the LCD When the first digit is displayed on the LCD, press the switch connected to RC7 to enter the digit and move to the next digit. After all three digits are entered, the LED connected to RC5 is turned on to indicate the security system is armed. The system can be disarmed in a same manner by entering a different code. Use following codes for the security system:
To arm the system: 123
To disarm the system: 230
The codes should be cleared after they have been entered for security reasons.
4. When the security loop is broken while the system is armed, the LED connected to RC5 must start to flash at a regular intervals (e.g. twice /second) for 30 seconds. During this period if the system is disarmed the LED must stop flashing and return to its off status. Though, if it is not disarmed in time then the system must automatically disarm itself.
Use Timer 0 in interrupt mode for flashing the RC5 LED.
Use Timer 1 in interrupt mode for timing 30 seconds.
7. Evidence
1- Formal report and logbook kept while developing